

Choosing a Freeview Box
Many different Freeview receivers are now available, giving a very wide choice for the consumer.
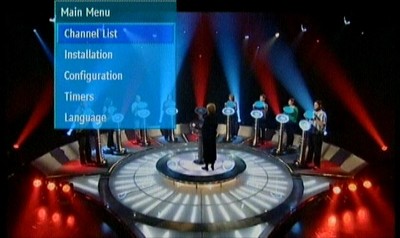
Most of these digiboxes are functionally very similar. They all use an "on screen" menu to control the box - your TV set becomes the display used for selecting the required option from a menu:
All Freeview boxes rely on a conventional TV aerial for their signal. The TV aerial must be connected first to the Freeview box.
A second aerial flylead is then used to connect the Freeview box to the TV set. The only purpose of this flylead is to allow analogue signals received by the aerial to "loop through" the digibox and be received by the TV set.
A SCART lead connects the picture and sound output from the Freeview box to the TV set. This requires setting the TV to "AV" (abbreviation for audio visual) input. TVs with several SCART sockets will have AV1, AV2 etc. but will also use this label style for non-SCART sockets such as S-video.
The SCART connections page gives typical connection diagrams for digiboxes and associated equipment.
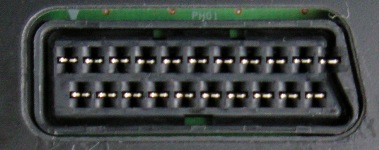
Old TV sets may not have a SCART connector - check the back of the TV to confirm (the SCART socket looks like the picture below - they may be either horizontal or vertical):
If the TV doesn't have a SCART connector, the digibox can be connected to a SCART socket on the back of a video recorder. By setting the TV to the "video" channel and then setting the video recorder to its "AV" input (by working backwards through the video channels: 4, 3, 2, 1, AV), the RF modulator in the video should then show the Freeview picture (coming from the digibox) on the TV set.
Most Freeview receivers allow either RGB or composite video outputs to be selected. Typically RGB gives a better picture quality, but RGB is only available when connecting directly to the TV by a SCART lead - any connection using either a UHF modulator or a video recorder will only display composite video - switching the Freeview box to RGB will appear to do nothing at all.
With a SCART connection, some TVs will detect when the Digibox is switched on and automatically select the SCART input (usually displaying "AV" on the screen briefly). Some TVs may not be able to return to the existing analogue channels until the digibox has been switched to "standby" - this is a function of the TV set, not the digibox.
A few Freeview boxes incorporate an RF modulator - this is very useful if your TV set doesn't have a SCART socket. The output from the Freeview receiver is then modulated onto an unused UHF channel, which then has to be "tuned" on the TV set (by selecting an unused channel number e.g. 6, and then setting this to correspond to the Freeview UHF output channel).
Viewing "digital" using this method requires the TV to be set to e.g. channel 6, and then subsequently using the digibox remote control to select the required digital channel.
Reviews of a variety of digiboxes are available on the internet. The Radio and Telly website shows a good selection of digiboxes, with reviews here. A cheap digibox can be useful to help identify any reception issues.
A high definition (HD) service is being planned for Freeview. Since the Freeview HD standard is still being defined, current digiboxes do not support it. Freeview HD will require both an HD ready TV set and a new (HD) digibox, together with an HDMI lead to connect the two together. Existing Freeview boxes will still work for the non-HD channels however. This may influence one's decision about what equipment to buy for the Switchover.
N.B. Old "OnDigital" digiboxes will not work after the switchover, since the digital modulation format will be changed from a 2k FFT to an 8k FFT, and all channels will also adopt the 64QAM format. See the Channels & MUXs page for more information.
Digibox (Freeview) Setup
When a Freeview box is first powered up, it will typically run its "first time" installation menu to search for available digital MUXs:

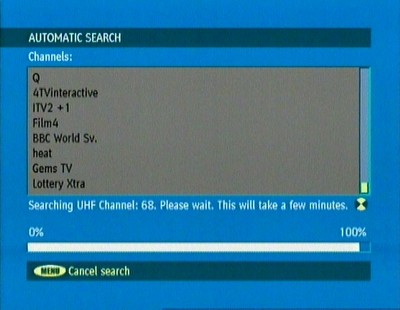
After selecting "Yes", the digibox will then proceed to search all the UHF channels (from 21 up to 68) and acquire the available digital programmes in each digital MUX:
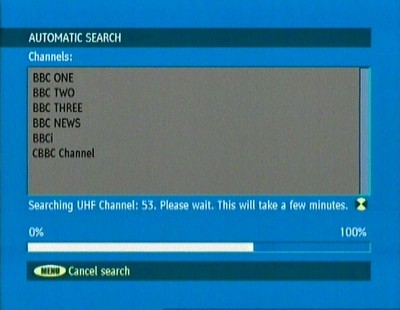
As the digibox finds the programmes, it adds them to its list of channels. Once the search is completed, the list will include TV, radio and Top Up TV listings:
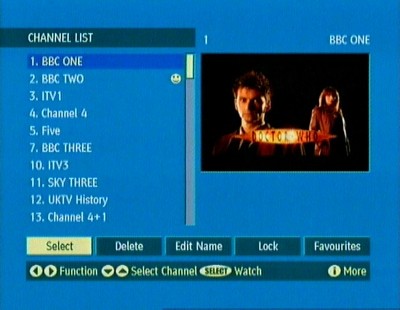
The digibox will then show the first programme in its programme list (which should be BBC1). To select a different programme, press the "menu" button to enable the "channel list" option to be selected. Pressing the OK button on some remotes also brings up the channel list menu.
The Channels & MUXs page gives a list of the programmes available on Freeview here.
If your TV doesn't have a SCART connection, and your digibox has a UHF modulator output, then the user manual should be checked to determine which channel the box is set to by default (typically either 36 or 68). The TV set will need to be tuned to this channel initially to be able to see the digibox menus and proceed with the setup.
N.B. If the menu option to change the UHF channel is used, then the TV picture (and corresponding menu screens) will disappear until the TV channel is re-tuned to find the new digibox RF channel.
The UHF channel number can be selected to help prevent interference with other analogue channels (e.g. TV stations, VCR or Sky box RF output). The Channels & MUXs page helps to explain why this matters, and how to choose a "good" channel. The proper remote controls will also be required to tune the TV and the VCR to the correct channel - so called "universal" remotes don't usually enable the necessary setup menus to be accessed.
Freeview Quality
Freeview reception quality depends on the ratio of the received signal strength to any noise or interference signal (the carrier to noise ratio).
In an ideal world, you buy a digibox, connect it up, switch it on and start watching Freeview digital programmes. Depending on a few factors, you may find:
a) The digibox works just fine.
b) The digibox does absolutely nothing.
c) The digibox works, but maybe only for some of the time, or it doesn't show all of the digital channels.
In areas with a good digital signal and a working TV aerial, Freeview should be straightforward. However, options b) and c) can easily happen, and the exact cause of the problem may not be easy to identify.
The Reception page shows what factors are involved and what can be done to improve reception.
Some digiboxes will show a signal quality indicator by pressing the "i" button on the remote. This shows a "bar" representing the combined signal strength and signal quality. Poor reception will correspond with a low reading on this indicator.
Sometimes the indicator has two "bars", one for signal strength (power) and another for signal quality (error ratio).
Different digiboxes may show the signal quality indicator for a couple of seconds after changing channels, or have the quality indicator(s) buried somewhere in the setup or installation menu.
Freeview Recording
Many Freeview boxes provide two SCART sockets on the back - one for connection to the TV and the other for connection to e.g. a VCR. This works fine in principle, as long as the VCR is set to an AV input (usually found by counting down through the programmes 4, 3, 2, 1, AV2, AV1) so that it can record from one of its SCART sockets. The limitation with this approach is that there is only one digital tuner (in the Freeview box), so the digital programme being watched will be the same as the one being recorded.
To enable an different digital programme to be recorded requires a second digital tuner. This could be from another Freeview box, but this gets complicated (multiple remote controls) and is unlikely to appeal to many people. There are no VCRs available with digital tuners, as VCRs are considered to be obsolete technology.
An alternative to the VCR is to use a PVR (personal video recorder), also referred to as a DVR (digital video recorder) . PVRs / DVRs incorporate at least one digital tuner, which records digital programmes onto a "hard drive" (maintaining the digital format), using technology developed for personal computers.
PVRs / DVRs are available with twin Freeview tuners - one for watching and another for recording from. These machines do not have tapes - there is no removable "media", unless a DVD is included within the PVR.
Recording time is typically nearly 40 hours (for an 80Gb hard drive), and the recorded picture quality is as good as the original transmission.
Freeview boxes and PVRs provide a list of programmes - the EPG (electronic programme guide), which lists the programmes by channel and time / day:
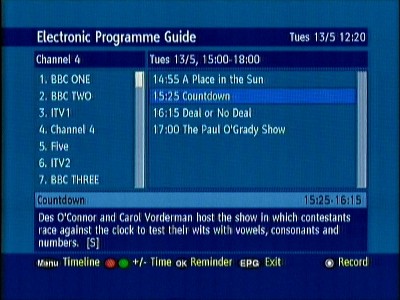
To record a programme, the EPG is selected and the required programme title is highlighted. By selecting the programme, the PVR then flags that this programme is to be recorded. This is fine if programmes start and end at the allotted time on the EPG, but as they sometimes don't, additional time can be added "manually" by editing the Start and Stop times. This may (unhelpfully) cause the programme name to change however, appearing on the recordings list with the name for the "previous" programme.
A nice feature of PVRs is that a recorded programme can be stopped part-way through playback - the PVR will remember where it was, and provide the option to continue on from there, even after it has been in standby, or has recorded or played other programmes.
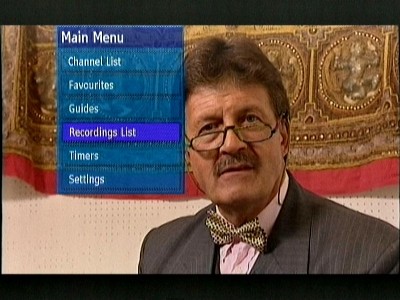
Access to the recorded programmes is provided through the main menu, which has a similar appearance to a standard Freeview receiver, but with the additional entry for "Recordings List":
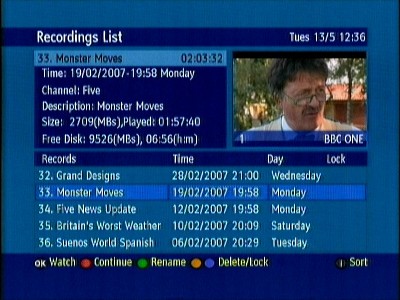
The list of recordings shows the programme name allocated from the EPG - sometimes this isn't especially helpful, particularly if it has picked up the name of the previous programme. The time and date of the recording are also useful to help identify particular programmes stored on the hard drive:
Once the PVR / DVR operation has been mastered, an old VCR is unlikely to be used a great deal, as it can't provide such good picture quality and uses tapes relatively quickly. One limitation of a PVR / DVR is that it does eventually require programmes stored on its hard drive to be watched and then deleted to make space available for further recordings. If recordings need to be kept, then a DVD recorder (either stand-alone, or integrated with the PVR / DVR) will be required.
Freeview+
Freeview+ is a term now being used for Freeview recorders with enhanced functionality which has some similarities to the Sky+ satellite recording system.
Most Freeview+ recorders incorporate twin tuners, which allows two different Freeview programmes to be recorded at the same time, even whilst watching a previous recording (record 2 / watch another).
N.B. Some Freeview+ recorders only allow record 1 / watch another.
Freeview+ enables the "pause, record, rewind live TV" functionality being advertised as present, but further features are also included.
The main functions offered by Freeview + are:
8 day (minimum) EPG
Record from EPG, with the EPG then updated to flag the scheduled recording
Simultaneous record and playback
On-screen messages from the recorder aren't recorded as part of the programme
Recording split events (e.g. a film shown either side of the news) as a single recording
Recording series events (e.g. a weekly programme) - the display indicates if the selected programme is part of a series
Pause live TV for at least 30 min
One touch recording of live TV (using a single button press)
Opportunity to record a related programme - the user is informed of the related programme
Record alternative / repeated programme showing if a timer conflict is detected
Automatically update the recording schedule in standby mode (if the scheduled start time is changed)
Accurate recording (PDC equivalent recording) - recording starts on a signal from the broadcaster rather than from the recorder's clock
Back to back programme recording on the same service is allowed and doesn't register as a confict
Although Freeview+ sounds like the perfect solution for recording Freeview programmes, instances of programmes being "chopped" do occur. Some additional time may be added to scheduled recordings to minimise this.
A list of Freeview+ equipment (hard drive recorders, DVD recorders, HDD/ DVD & video, TVs with Freeview+) is provided on the Freeview website.
Digital Ready TVs....
With a "digital ready" TV, the Freeview tuner is already incorporated into the TV set, and almost always is accompanied by an analogue TV tuner (which is fully independent - but just happens to be inside the same TV set). Having both types of tuners also requires the TV set to be able to be "switched" between them when necessary. Even after the Digtial Switchover, watching a Sky box by using the RF2 connection (e.g. to a remote TV) will still require an analogue TV tuner since the RF2 output is still an analogue signal. Switching between analogue and digital tuners is achieved either by selecting ATV or DTV on the TV's remote control, or by pressing and holding the input button (to bring up the input menu, which will including analogue or digital TV options and the external A/V sockets).
....and impact damage (e.g. from Wii Remote)
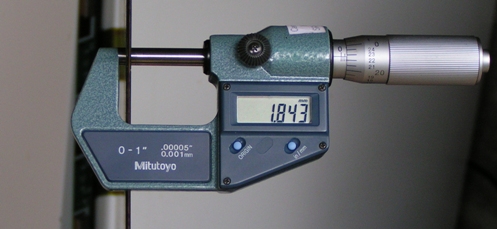
Many "digital ready" TVs use LCD screens. The LCD screen itself is less than 2mm thick, and is made from two (thin, ~0.7mm) sheets of glass bonded together with the liquid crystal material filling a very small gap in between. Polariser film is attached to the front and rear surfaces of the panel. The internal surfaces of the glass are coated with thin film transistors (TFT) to enable individual pixels to be controlled. The whole assembly is somewhat flexible because it is so thin.
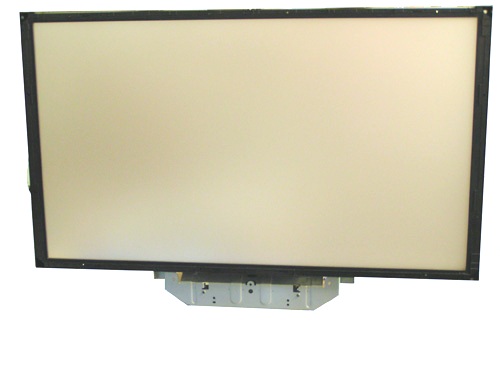
The LCD panel is quite delicate - the following photographs (showing the chassis underneath the decorative trim) give an idea of what happens when a Wii Remote wrist strap breaks and impacts the TV screen. With the TV switched OFF, nothing appears to be wrong - there's no apparent damage on the front surface:

However, as soon as the set is switched on, it looks rather alarming:

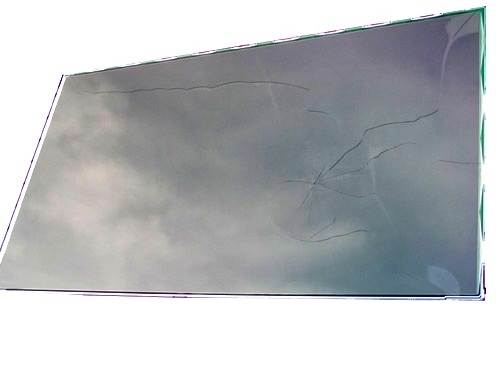
The point of impact is now clearly visible, with radiating "cracks" and one further long "crack" running up to the top right-hand corner. The light patch visible on the left side is effectively a clear view "through" the panel, where the liquid crystal isn't present anymore.
With the LCD panel removed, the cracks can be seen on the rearmost glass sheet (underneath the polariser film which is holding the broken glass together):
 |  |
Behind the LCD panel is the backlight, which consists of a series of cold cathode lights (like miniature fluorescent tubes) and a diffuser screen. The diffuser screen consists of several translucent plastic sheets held flat behind the LCD panel by a plastic frame:
Behind the diffuser are the regularly spaced cold cathode lights, with a white plastic reflector behind to provide something close to a uniform light intensity across the screen:

The thickness of the display on the TV set is defined largely by the space occupied by these cold cathode lights and the diffusers, with the LCD panel adding just under 2mm at the front. The cold cathode lights actually run warm (optimum efficiency is achieved at about 40°C), and require high voltage AC (~800V) to operate.
The rest of the thickness of the TV set is used to house the electronics, which projects out a little way at the back:

The cost of a replacement LCD panel for a TV set like this (40") is typically as much as (or possibly more than) the cost of a complete replacement TV - hence it pays to look after these kind of displays.