

Aerial Installation and Height Safety
This section is mostly for the benefit of other installers, and gives personal views only, which should not be taken as any kind of recommendation or advice. Height safety is ultimately the responsibility of each individual concerned. I'm indebted to Jez Hunter of Rig Systems Ltd, Wadebridge for help with understanding the Work at Heights requirements and for many useful discussions on equipment options and safety.
The equipment required to meet H & S guidelines is a significant expense for installers, and needs to be carefully considered, particularly for a first-time purchase. Being able to discuss with Jez the equipment options, usage and limitations has proved extremely helpful for me, and I'd strongly recommend this approach before committing to an item. Jez has an excellent knowledge of all aspects of height safety (not just aerial installation) so he's a useful person to know.
Current health and safety legislation requires aerial installers to have appropriate training in the use of height safety equipment and to implement this when working at height. The basic requirement is for the installer to secure the ladder (or ladders) and to use a fall arrest system.
The preferred method to secure the main ladder is to drill a hole in the wall and use an eye bolt with a strap taken through a ladder rung and tensioned to pull the ladder into the wall slightly. This method works well and minimises ladder bounce when using a long extension.
The only issue here for customers is with the hole drilled in the wall of their house. A hole for an eye bolt will be necessary (unless an equivalent alternative is available) which will either be fitted with a plug or filled with sealant after completion of the job.
Ladder safety precautions ensure that the base of the ladder will not move out from the wall and that the top of the ladder cannot slide sideways. Having established a secure ladder, the height safety regulations then require the use of a fall arrest system with the ladder, unless the ladder access is required for a short duration only and three points of contact (e.g. two feet and one hand) can be maintained at all times.
The recommended fall arrest system uses a rope secured to the top rung of the main ladder (and a second rope attached to the top rung of the roof ladder if it is being used) with a rope grab, attached to the installer (wearing a safety harness) using a karabiner. To transfer from the main ladder to the roof ladder requires the use of an additional short lanyard, used to secure the installer to the main ladder whilst he removes the rope grab from the main ladder and attaches it to the rope on the roof ladder. This level of complication illustrates the need for training in the use of this kind of equipment.
When I've asked other installers about height safety and how often they use their fall arrest equipment, typically the answer is that they'll always try to avoid using it. Ladder securing systems rate highly with installers, but the fall arrest gear is often felt to compromise their ability to "do the job".
Two particular aspects of fall arrest equipment that directly affect aerial installers are:
| a) | The safety harness, which has two attachment points (front and rear), with the front (sternal) attachment used with a karabiner to connect to the rope grab. |
| From an installer's point of view, the safety harness provides no additional function, other than this attachment point, and potentially interferes with wearing a tool vest (containing all manner of spanners, screwdrivers, connectors and other essential "stuff"). | |
| b) | The rope grab, which is intended to "follow" the installer up the rope on the ladder, and similarly "follow" him down again (gently pulling on the attachment makes the rope slip through the grab without it biting onto the rope). In a fall situation, the rope grab jams itself onto the rope and can only be released by removing the load (i.e. the installer's body weight). |
| This works OK on the main ladder, but the grab can have a tendency to "snag" when descending an inclined roof ladder as gravity isn't assisting its descent. From an installer's point of view, this is problematic, as he may well have an old aerial and mast to remove from the roof / chimney in one hand, and doesn't want to use the other hand to continually have to "free" the rope grab. Similarly, when ascending the main ladder with a new aerial and mast in one hand, attaching the lanyard and swapping the rope grab onto the roof ladder with the one remaining empty hand is relatively difficult and leaves no hands available for holding on to the ladder. |
Looking at these safety equipment items in turn, what options are there to mitigate the perceived complications?
Safety Harness
A 2 point full body harness meets the regulatory requirement, and is typically issued as PPE to installers. The essential feature of the harness is the front (sternal) attachment:
 | 
|
To be effective, the sternal attachment point must be accessible, which tends to suggest that the harness should be worn on the outside of any other clothing. However, for aerial installers, the key item of clothing for "doing the job" is a tool vest, which typically has to carry the following items:
Spanners, screwdrivers, cable stripper, compass, knife, cable cutters, pliers, insulation tape, sockets & SDS adapter, coach bolts, wallplugs and cable clips.
 |
The installer wants all of these tools easily accessible, so typically requires the tool vest on the outside of any other clothing. Clearly the tool vest cannot be used under the safety harness as the tools will be inaccessible and will interfere with the fit of the harness. So can the harness be used under the tool vest?
The answer is yes, but it requires the tool vest to either have a gap between fasteners at the front or to be only partially zipped up, to leave clear access to the sternal attachment point on the harness. No great problem here, provided that the harness is comfortable and can be worn all day - this tends to be better with harnesses that have wider straps, or possibly some "give" in elastic sections.
There are a couple of further considerations for the safety harness, which are associated with having a waist belt incorporated into the harness. Without an integral belt, the harness is just PPE, and offers no further incentive to the wearer to use it. However, incorporating a harness waist belt fitted with tool loops and lateral attachment points begins to offer additional features that make the harness more useful for "doing the job".
A waist belt allows items such as tool holders to be attached, though most aerial installers would still favour a tool vest. The waist belt also provides lateral attachment points, which enables a work positioning lanyard to be used. The work positioning lanyard (e.g. a Petzl Grillon) gives the installer a much more flexible system which is still compatible with the rest of the height safety gear.
Specific applications for work positioning / work restraint are:
Large chimney stacks - where access around the stack (to position the corner plates under a lashing wire) would otherwise be difficult.
Flat roofs - where access to the edge may be the only way to allow large items (like a satellite dish) to be hauled up the outside of the building.
N.B. work positioning equipment still requires a separate fall arrest system to be used.
The following photographs show a Petzl Navaho Bod harness; a Bosch tool vest (without the harness underneath) and the tool vest with the harness underneath. Having a harness with wide bands for the leg loops, waist belt and shoulder straps significantly improves comfort for the wearer, and enables the harness to be worn all day if necessary. Additionally, the risk to the wearer from being suspended is reduced.
 |  | 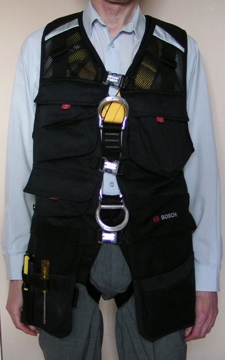 |
The upper fasteners for the tool vest have been closed behind the sternal attachment and karabiner in the third photo above. The lateral attachment points and tool loops (visible in the first photo above) are accessible through the gaps at the sides of the tool vest, with all the tools in the vest fully accessible.
Fall Arrest System
The SKR rope grab (shown below left) works well on a vertical or near vertical rope, and can be used effectively on the main access ladder.
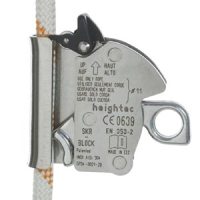 |  |
On the right hand side above is a Petzl ASAP fall arrester. These two units have subtly different operating methods:
The SKR device works by having a sprung pivoted runner pressing onto the rope which jams the rope when a load is applied downwards on the attachment point. The unit will hold itself in position on a rope, and will descend when a small downwards force (drag) is applied at the attachment point, using a combination of gravity on the unit itself and a downwards (light) pull. A heavy pull causes the device to grab the rope. When used on sloping ropes (e.g. on a cat ladder), gravity contributes much less, and the device has a tendency to grab with even a light pull on the attachment point.
The Petzl device also has a sprung pivoted component, but this is independent of the attachment point which is provided by a karabiner through the body of the ASAP device (and which also keeps the rope in the correct position). The ASAP has spiked teeth (slanting) around a rotating wheel, with the axle mounted on the sprung pivoting section. When ascending the rope, the downward pointing teeth (at the contact point with the rope) slip over the rope jacket. When descending, the rope the teeth bite into the rope, but with a light pull the wheel can rotate (it feels stiff to the fingers) and the device is easily pulled down the rope. With a greater downwards force applied, the toothed wheel bites into the rope, but now the wheel jams the rope against the body of the device, thus grabbing the rope.
The advantage of the ASAP device is that it doesn't rely on any contribution from gravity, and hence can be used just as effectively on an inclined rope. The disadvantage of the ASAP is that it may not grab the rope quite as quickly as the SKR device - Petzl make a shock absorber (ASAP Sorber) which can be used in conjunction with the device, and which provides a little more "feedom", but the ASAP can also be used on its own. The ASAP does cost more than the SKR as a fall arrest solution.
Rope Attachment
The manucroche is the recommended way of attaching the rope onto the top rung of the ladder. This gives a rapid attachment, but the manucroche doesn't grip the ladder rung, and as a result tends to move around in use. An alternative is to use a scaffold sling on the top rung, which requires an additional karabiner, but allows the rope to be positioned where required (e.g. at one side of the ladder) and keeps it there.
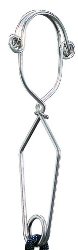 |  |
The attachment to the ladder rung is worth consideration here - should a fall occur, the dynamic shock load (of a falling person) has to be sustained by the rope grab, the rope itself, the rope attachment and also by the ladder rung. This is what differentiates a "DIY" ladder from a "trade" ladder, where the rungs and stiles are stronger and meet the requirements of EN131, but the same may not necessarily be true for a roof ladder - this should be checked before relying on it. The same consideration also highlights why the main ladder is secured so well (to prevent it moving), and why it is essential to secure the roof ladder properly.
Work Positioning
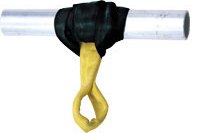
For aerial installations, a chimney strop is available which provides a temporary anchorage point around e.g. a chimney stack.
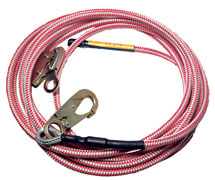 |
The strop comprises a steel cable covered with a durable nylon jacket, giving it the appearance of a climbing rope but a lot heavier! One end has a hook which connects to the ring on the rope grab. This enables the strop to be fitted around a chimney stack and then pulled tight enough to remove most of the slack. This gives a temporary connection point for the attachment of a lanyard.
The installation of the chimney strop can be tricky - the device is supposed to be made into a loop and "thrown" over the chimney stack. This may not be possible however (especially if an old aerial is in the way), but tricks such as using a tennis ball attached to a piece of string can be used to get "something" around the stack which can then be used to pull the chimney strop around.
Once in place, connecting to the chimney strop is achieved using a lanyard. The recommended lanyard (the same one used when transferring the rope grab from the main ladder to the roof ladder rope) is very short and non-adjustable, which can make it awkward to use around the stack. An alternative is to use an adjustable lanyard (e.g. Petzl Grillon):
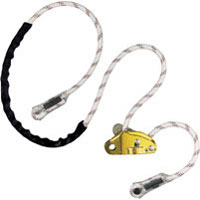 |
The Grillon is used with both side (lateral) attachment rings on the waist belt of a harness to form a loop around a suitable attachment point, leaving a free end of rope. The Grillon includes its own rope grab, which can be adjusted to set the length of the rope loop so that a comfortable working position can be found. As stated previously, use of work positioning lanyards still requires an independent fall arrest system to be used.
Best Practice
Before starting on any activity requiring the use of ladders, a risk assessment has to be done, to identify all the hazards and options to mitigate their impact. Aerial installation can include aspects of working at height that may not be ideal, but for which there is no readily available alternative. In these circumstances, the risk assessment provides the means to assess whether these risks are considered acceptable, or whether some alternative needs to be implemented.
When an aerial and mast needs to be either taken up or down a roof ladder, the task does not take any significant time on the ladder but it can be difficult to maintain three points of contact. Best practice may be achieved by using a rope on the roof ladder with a rope grab, but is the roof ladder suitable for this kind of loading and is there any other alternative? A different point of view could be to avoid the use of the rope grab on the roof ladder just for that particular stage of the installation, relying on the availability of three points of contact. This could be justified if the installer uses a sling (or other means of supporting the aerial, to keep at least one hand free) whilst transferring between ladders.
For roof ladders located close to a gable end on a roof, additional securing straps may need to prevent the ladder (and installer) coming off the ridge. Ultimately, there is no single method that can be universally applied to all installations. Each one has to be individually assessed, and the appropriate precautions taken for each job uniquely - which is why height safety training is essential to instil the necessary understanding.